
Managing a cluttered inbox can feel overwhelming, especially if you receive dozens of emails every day. Whether it’s promotions, newsletters, or work messages, learning how to filter emails in Gmail can make your inbox more organized and your workflow much smoother. Gmail basics are easy to understand and easier to master, offering powerful tools that let you automatically sort, label, archive, or even delete emails based on specific criteria.
In this article, we’ll cover everything you need to know about Gmail filters, walk you through a simple step-by-step guide, answer frequently asked questions, and share tips for getting the most out of your Gmail account.
Why Use Filters in Gmail?
Learning how to filter emails is a very useful skill; filters are like personal assistants for your inbox. Instead of manually sorting through messages, you can create rules that tell Gmail what to do with certain emails as soon as they arrive. This saves time, keeps your inbox tidy, and helps ensure important messages don’t get buried.
Some common uses include:
- Automatically sending newsletters to a specific folder.
Marking work-related emails as important. - Filtering out spam or unwanted messages.
- Archiving old emails you don’t need to see daily.
- Highlighting emails from specific contacts.
Step-by-Step Guide: How Can I Filter Emails in Gmail
Follow these simple steps to create filters in Gmail:
Step 1: Open Gmail
Log in to your Gmail account on desktop.
Step 2: Click the Search Options Icon
In the search bar at the top, you’ll see a small downward arrow. Click it to open advanced search options.
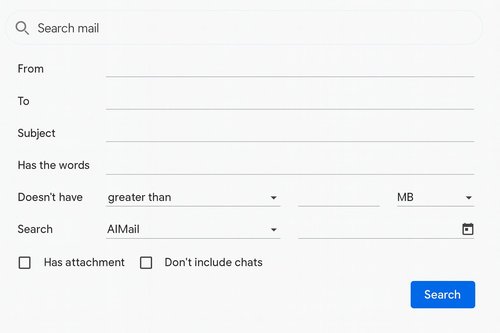
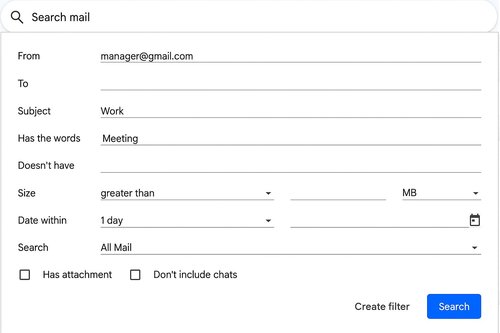
Step 3: Set Your Filter Criteria
Enter details such as the sender’s email address, subject line, keywords, or size of the email. You can use one or multiple criteria.
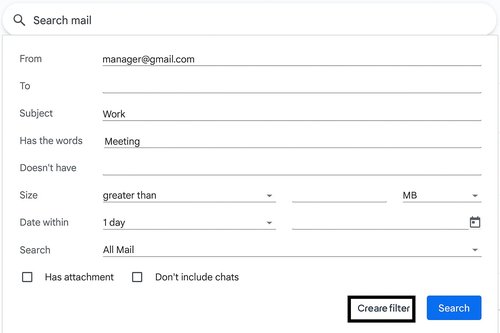
Step 4: Click “Create Filter”
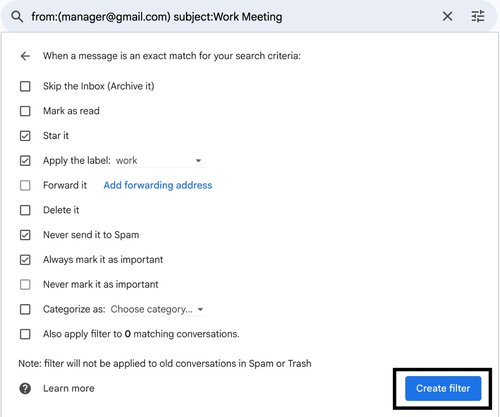
After setting your conditions, click “Create filter” at the bottom right of the search window.
Step 5: Choose an Action
Decide what Gmail should do with matching emails. Options include:

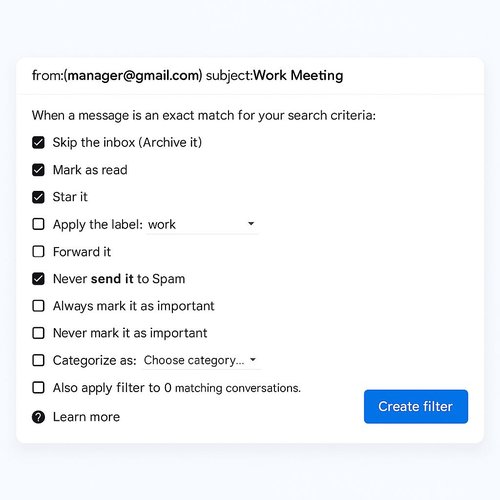
Step 6: Apply to Existing Emails (Optional)
If you want Gmail to also filter existing emails, check the box before finalizing.
Step 7: Save the Filter
Click “Create filter,” and your new rule is ready. From now on, Gmail will handle matching emails according to your settings.
Best Practices for Gmail Filters
To get the most out of Gmail filters, keep these tips in mind:
- Use Labels Wisely
Labels act like folders but allow emails to exist in multiple categories. - Combine Multiple Filters
For example, filter emails from “@newsletter.com” with the word “Sale” in the subject. - Review Filters Regularly
Your email needs may change, so update filters every few months. - Pair with Gmail Tabs
Filters work well alongside Gmail’s default tabs like Primary, Promotions, and Updates.
Simplify Your Inbox with EmailGurus
EmailGurus makes email management effortless. Block spam, organize your messages, and keep your focus where it matters. Subscribe today and enjoy a smarter inbox!
FAQs
1. Can I edit or delete a filter later?
Yes. Go to Settings → See All Settings → Filters and Blocked Addresses. From there, you can edit, delete, or export filters.
2. Do filters apply on mobile Gmail?
Yes, but filters must be created on desktop first. Once created, they work across all devices, including the Gmail app.
3. Can filters reduce spam?
While Gmail’s built-in spam filter is strong, you can add your own rules. For example, you can auto-delete emails containing certain phrases.
4. How many filters can I create in Gmail?
You can create up to 1,000 filters in Gmail, which is more than enough for most users.
5. Do filters affect already received emails?
Only if you check the box to apply them to existing messages when creating the filter. Otherwise, they only affect new incoming emails.
6. Can I edit or delete a filter later?
Yes. Go to Settings → See All Settings → Filters and Blocked Addresses. From there, you can edit, delete, or export filters.
Whether you want to separate work emails from personal ones, filter out spam, or highlight urgent messages, Gmail’s filter feature gives you complete control over your inbox. Mastering these Gmail basics lets you create rules that automatically sort, label, or archive emails, keeping your inbox efficient. By learning how to filter emails effectively, you’ll spend less time digging through clutter and more time focusing on what matters. Filters are flexible, you can start simple and refine them as your needs grow. Over time, you’ll notice a big difference: fewer distractions, better organization, and a stress-free inbox. With just a few clicks, Gmail filters can transform communication, saving you time and boosting productivity.