
It might be hard to keep up with your emails when your inbox is full of emails from websites you don't remember signing up for, old newsletters combined alongside urgent work emails. Gmail filters are a very useful and easy-to-use tool that allows you to automatically organize incoming emails, keeping your inbox clutter-free.
In this guide, we’ll walk you through how to create filters in Gmail step by step and show you how they can improve your overall email management and organization.
What Are Gmail Filters?
Gmail filters are customizable rules that you set up to automatically manage incoming emails. For example, you can:
- Send newsletters directly to a “Newsletters” folder.
- Automatically delete spam messages.
- Apply labels for easy categorization.
Instead of sorting emails manually, Gmail filters do the work for you. It’s one of the easiest ways to improve email management.
How to Filter Emails in Gmail
When it comes to Gmail, the term “filtering” can mean two different things:
- Using the search bar to quickly find specific emails
- Creating Gmail filters (rules) that automatically sort incoming mail
For example, if you would like Gmail to automatically delete promotional emails, one of the easiest ways to do this is by searching for a keyword that nearly all of these messages include, for example, “unsubscribe.”
After searching for the keyword, all emails containing the word “unsubscribe” will appear, then select “Create filter” to build a rule. From there, you can decide what happens to future emails that meet those conditions, whether that’s deleting them, skipping the inbox, or moving them into a specific folder.
Using this method is a quick and effective way to keep your Gmail inbox organised without having to sort every message manually.
Step-by-Step Guide on How to Create a Gmail Filter
Step 1: Open Gmail
Log in to your Gmail account at mail.google.com.
Step 2: Open Search Options
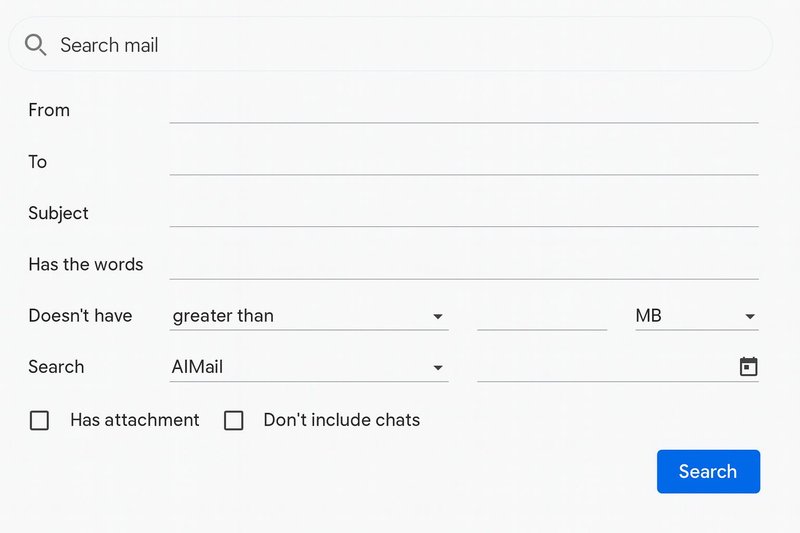
Click the downward-facing triangle in the Gmail search bar at the top. This opens the advanced search box.
Step 3: Define Your Filter Criteria

Enter the specific criteria that determine which emails should be filtered, such as:

- From: Filter emails from a specific sender.
- Subject: Filter by subject keywords.
- Has the words: Filter messages containing certain text.
- Size: Sort emails based on file size.
- Has attachment: Only include emails with attachments.
Step 4: Create the Filter
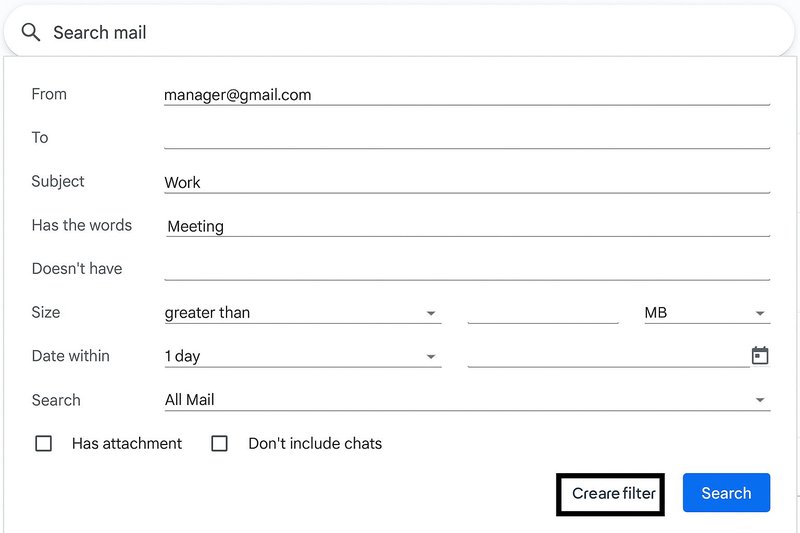
Click “Create filter” in the bottom-right corner of the search box.
Step 5: Choose an Action
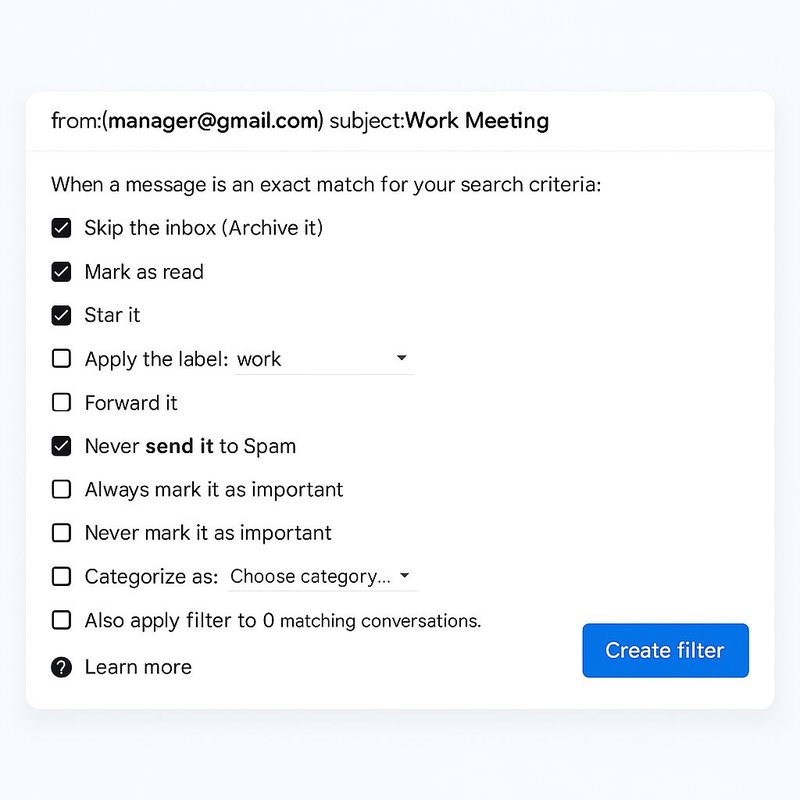
Decide what happens when an email matches your filter:
- Skip the Inbox (Archive it): Moves the email out of your main inbox and stores it in “All Mail,” keeping things tidy without deleting it.
- Mark as Read: Lets the email stay in your inbox but shows it as already opened, so it doesn’t appear as a new message.
- Star it: Highlights the email with a star so it’s easier to find later.
- Apply a Label: Automatically tags the email with a label (like a folder), helping you organize by topic or category.
- Delete it: Sends the message straight to the Trash folder.
- Never Send to Spam: Ensures Gmail won’t mistakenly filter that email into your Spam folder.
- Always Mark as Important: Flags the message as important so it stands out in your inbox.
- Never Mark as Important: Prevents Gmail from highlighting the email as important.
- Categorize As: Places the email into one of Gmail’s built-in categories (such as Primary, Promotions, Social, or Updates).
- Apply Filter to Matching Conversations: Applies the filter not only to new emails but also to existing messages in your account that meet the same conditions.
Step 6: Save the Filter
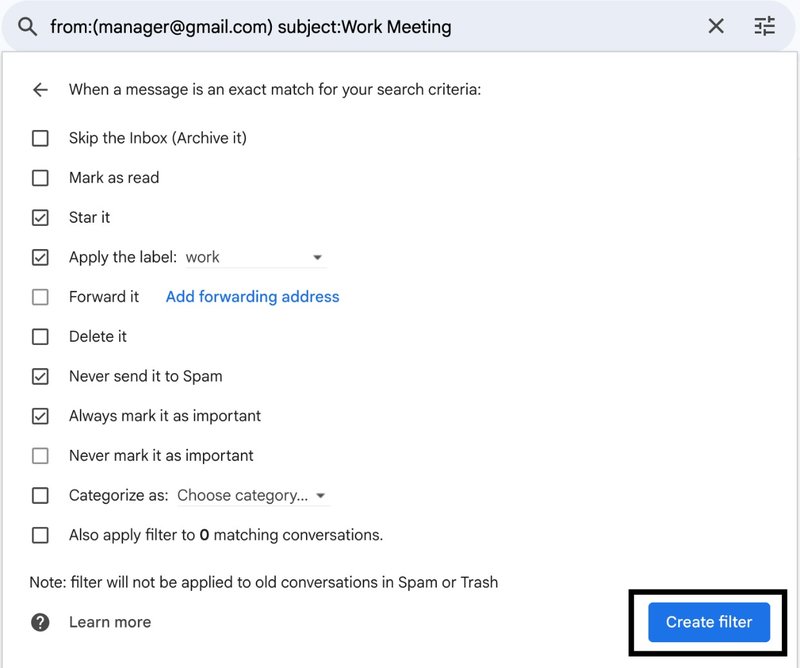
Click “Create filter.” Your filter will now automatically handle incoming emails.
For example, want all newsletters to go into a separate folder? This is how to do it:
- In Step 3, type unsubscribe in “Has the words.”
- In Step 5, select Skip the Inbox and Apply the label → Newsletters.
From now on, Gmail will neatly organise your newsletters without you lifting a finger.
Filter Your Mail with Emailgurus
With Emailgurus, you’ll find that email management becomes a lot easier, saving you time to focus on what’s important, by automatically sorting out your messages and giving. Try it today!
FAQ
How can I free up space in Gmail using a filter?
Here’s how to free up space using your existing Gmail filter:
- Click the Settings (gear icon) and go to See all settings → Filters and Blocked Addresses.
- Find your newsletter or promotional filter and click Edit. The filter form will open with your existing criteria.
- Click Continue without changing the filter conditions.
- Uncheck the option Skip the Inbox (Archive it).
- Check both Delete it and also Apply filter to # matching conversations. Gmail will show you how many emails match this filter.
- Save the changes. Gmail will automatically delete all emails previously archived by this filter, freeing up storage space.
Do Gmail filters work on existing emails?
Gmail filters only apply to new incoming messages. However, when you’re creating a filter, you can check the option “Also apply filter to matching conversations” to organize emails that are already in your inbox. This makes it easy to clean up emails all at once without having to do it manually.
Can I create multiple filters for the same sender?
Yes, you can. Gmail allows you to set up more than one filter for the same email address or keyword. For example, you could label emails from a client with a “Work” tag and also forward them to your manager.
How many filters can you have in Gmail?
Gmail lets each account create up to 1,000 filters. This is more than enough for most users, even if you have separate filters for work, newsletters, receipts, and personal emails.
Gmail filters take the stress out of email management by automatically sorting, labelling, archiving, or deleting messages so your inbox stays clutter-free. From newsletters and promotions to work emails, filters ensure what matters most always stands out. Set up a few today using this step-by-step guide and see how a simple change can make managing your emails much smoother.